 Home >
 Knowledge Base >
 FAQs >
 Downloads >
Firmware Installation for AKI-CDB Panels
Firmware on an AKI-CDB Panel can be loaded either by Ethernet or by USB.
Setup if Loading via Ethernet
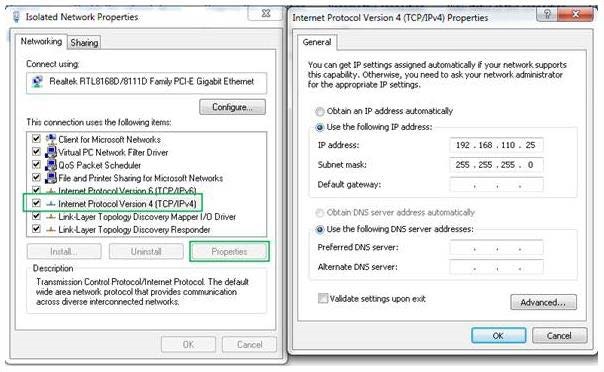
If loading via Ethernet, make sure that the computer IP address is in the same range as the AKI - CDB Panel and that the subnet mask is the same. The computer will need to be set with a static IP address. If you need to set it as static or change the IP address you can do it through the Network Properties:
Before starting the Firmware Update program, make sure you can ping the terminal.
Loading Firmware
Open the file IML_TxB_bx.exe (where bx is the build number) on the PC.

Loading via USB
If updating via USB, select the correct drive letter and select “Create”. After the firmware files have been loaded onto the USB, eject the USB and insert it into the AKI - CDB panel. If the panel is already powered on, you will need to power cycle the unit with the USB attached. When prompted by the panel “Do you want to update?” select the button “Yes”. A window will then popup warning the user to not interupt power during firmware loading. Select “Continue”. Finally a popup will prompt the user to click “Yes” or “No” whether to erase the current project on the panel if a current project exists.
Once firmware has been loaded the user will be prompted to remove the USB device. After the USB has been removed, the user will be prompted to reboot the panel. During the boot process the firmware will finish installing.
Loading Via Ethernet
Enter the AKI - CDB Panel IP address in the box shown above. It may be necessary to turn off the firewall on the PC and if using more than one network card, it may be necessary to disable the other IP address.
Press the “Update” button.
If you get the error message below, check the IP address of the panel and the computer. You may need to disable the firewall on the computer or use a cross-over cable. Make sure you can ping the panel and select the “Update” button again.

If the PC can communicate with the panel you should see the message below stating the IP address of the panel that is about to be updated.
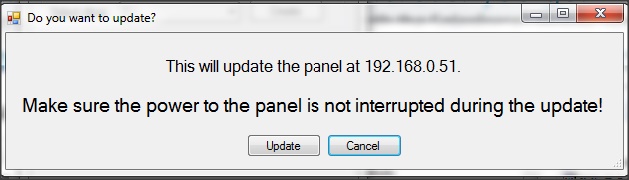
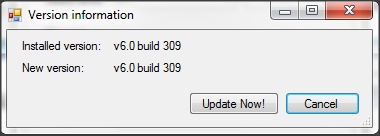
Click “Update” to continue loading firmware to the panel at the specified address. You will then be shown a popup window that displays the firmware build currently on the panel and the firmware build you are about to load. If you want to continue with the firmware load, click “Update Now!”
If the firmware starts loading you will see the progress bar begin to move.
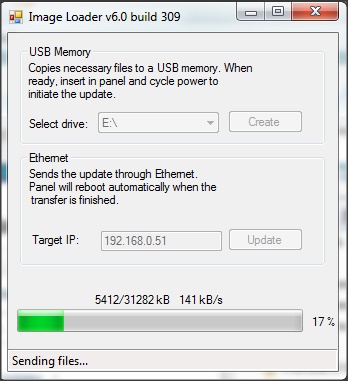
When the progress bar has reached 100% you will briefly see the message at the bottom change from “Sending Files” to “Rebooting Terminal”. Once the panel begins booting up you will see files being loaded. When those files are loaded you will see a message to power cycle the terminal.